
This article details the process of upgrading from SureSync MFT v1 to MFT v2.
SureSync MFT v2 features several optimizations to the MFT database to improve performance. The upgrade requires a database conversion program to be run. The Hub must be stopped when the conversion runs, and no Jobs can be run.
The conversion process can take some time, depending on the number of files in your environment. The conversion performance depends largely on the speed of the hard drives on the SQL Server machine hosting the MFT database. This process is estimated to take 3 to 10 minutes for each 1 million files the utility processes.
In large environments, you may want to schedule the upgrade over the weekend to allow time for the conversion to complete.
If you want to determine the number of files in your database ahead of time, you can run the following query in SQL Management Studio against your MFT database:
-- File Count
select count(*)
from FileIdDefinitions
Step 1: Backup your existing MFT Database
Use SQL Management Studio to perform a backup of your existing MFT database. This will allow you to restore the database if an unforeseen error occurs.
Instructions for using SQL Management Studio to backup a database can be found at https://learn.microsoft.com/en-us/sql/relational-databases/backup-restore/quickstart-backup-restore-database?view=sql-server-ver16&tabs=ssms.
Step 2: Download the Setup
You can download the latest version of SureSync MFT by clicking here.
No new license key is needed for v2, your existing license will work.
Step 3: Install on the Hub machine
Run the installer on the Hub machine and follow the on-screen instructions to upgrade the software on that machine.
Launch the Services MMC and stop the Software Pursuits SureSync MFT Communications Agent service if it's running.
Step 4: Upgrade the Database
On the Hub machine, go to the Start menu, click on SureSync MFT and then the MFT v2 Database Upgrade Utility.
The following program will display:

Click on the "Start Conversion" button.
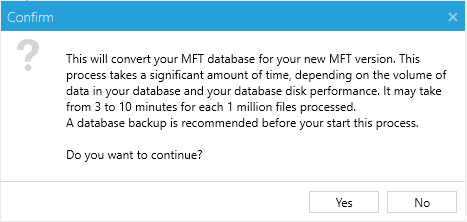
Click on "Yes" to continue.
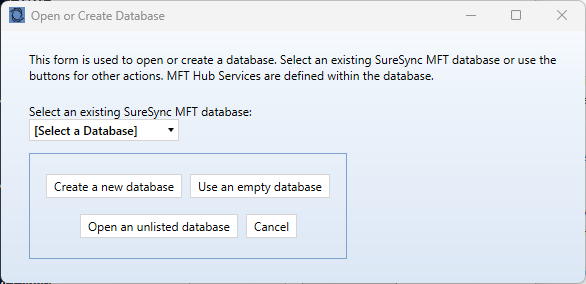
On the next dialog, you can select the database to upgrade from the "Select an existing SureSync MFT database" drop-down menu and the conversion will start automatically.
If the database to upgrade is not on the list, click on the "Open an unlisted database" button and filling out the fields like shown in the dialog below. Be sure to click on the "Set SQL Server Database Credentials" button to provide the SQL user account to use. Click the "Continue" button to start the conversion.

The conversion program will show status as it proceeds through the conversion process. When complete, you will see the following:

Click "OK" and then the "X" in the upper right-hand corner to close the conversion program.
Step 5: Upgrade Remote Communications Agent Installations
Run the SureSync MFT setup on each remote computer running a Communications Agent. Follow the prompts in the installer to complete the upgrade.
This step does not need to be performed right away but is strongly recommended. The Hub running v2 can communicate with remote agents running v1 but you will not have all of the available fixes. If you do not upgrade the agents right away, it should be done as soon as possible.
Step 6: Start the Hub and enable your Jobs
Launch the Services MMC on the Hub machine and start the Software Pursuits SureSync MFT Communications Agent service.
Launch the MFT Desktop and enable any Jobs if they were in a disabled state to resume processing.